| Wiki Home | WinLibre Home |
|---|
Final Touch
Presentation
 | Final Touch is an image manipulation tool developped for the Google Summer of Code program. This project is developed under the GPL public licence. The second Public Beta Version is now available (30/08/2005) Download Final Touch (555kb) Now ! |
|---|
Installation
The installation is quite easy, and you can accomplish it in 2 steps:
- Unzip FinalTouch.zip
- Launch FinalTouch.exe
Features
- User friendly GUI
- Automatic filtering
- High quality processing
- Unique filter equations
GUI
To make this program easy for the end user, the GUI is quite simple and efficient. It has 4 basic parts:
- Main menu
- Toolbar
- Statusbar
- Work area

Main menu
You can access every function of this program from the main menu. Some things like open, save, undo, etc. can be only accessed from the main menu, or using the defined keyboard shortcuts. If you want to zoom the image in the work area, you can do it either from the menu, using the shortcuts or on the statusbar. The filters can be accessed from the menu and the toolbar. You can also hide the toolbar and the statusbar in the menu if you want to see a larger image in full resolution.
Toolbar
The toolbar is divided into 4 sections:
- Image adjustments
- Enhancement tools
- Special effects
- Video processing
You can easily navigate between the sections using the tabs, or you can directly access any of the filters from the main menu. If the toolbar is invisible, it will become visible until you set the properties of the filter, but it will disappear as soon as you click “Apply” or “Cancel”.
Buttons on the toolbar
For all effects (excluding red eye removal) you have the following buttons visible on the toolbar:
- Preview
- Cancel
- Apply
By pressing the “Preview” button you can see the filter you are adjusting rendered on the image in the work area.
By pressing the “Cancel” button you can remove the effect of the previewing from the image in the work area.
By pressing the “Apply” button you make a permanent change to the image, which can be only undone using the “Undo” option.
You have 2 buttons on the video processing tabsheet:
- Apply filter engine
- Enable preview
This buttons are disabled by default and they get auto enabled once you select a folder which contains at least 3 bmp files. Once you press the Enable preview button, the video preview panel is visible. You can select a frame for previewing on the video selection panel by moving the scrollbar and pressing the Preview frame button visible on the panel.
Image adjustments
Using the “Image adjustments” panel you can easily modify the image to improve it’s visual effect. Within the image adjustments panel you can choose between the 6 basic filter pairs:
- Brightness / Contrast
- Hue / Saturation
- Sharpen / Blur
- Levels / Gama
- Resize / Crop
- Rotation / Mirror
Enhancement tools
The enhancement tools are a set of automatic filters:
- Red eye removal
- Noise removal
- Compression artifact removal
- Deblock
- Dering
- Fix chrominance
- Equalize
- Luminance
- All channels
- Auto processing
- Auto sharpness
- Auto region equalize
Special effects
If you want to get an unnatural look to your image, you should use the special effects panel. It contains the following filters:
- General convolution
- Lightning effects
- Artistic effects
- Diffuse glow
- Edge detect
- Emboss
- Icey
- Painting
Video processing
The video processing page makes it possible to work with image sequences exported from video files. You can apply a pre-recorded batch to the image sequence or to deinterlace the sequence, change it’s framerate or to use the video noise removal filter or the VHS chrominance artifact removal filter. The video processing page is divided into 4 sections:
- Folders
- Field settings
- Framerate settings
- Choose filters
Status bar
The status bar is displayed on the bottom of the program window and it contains information about the image you are modifying (name and resolution), program messages and zoom controls. Using the zoom controls you can zoom in or out by one level, or to jump to the desired zoom level. The limits are 25% and 400% of the original image size. You can hide or show the toolbar from the main menu.
Work area
The largest part of the window is the work or image preview area. The currently loaded image is displayed in this area. You can move the image with the mouse, or to zoom it using the zoom controls on the status bar or in the main menu. The work area is also used in the red eye removal filter to select the eye you want to correct.
Automatic filtering
Within the Enhancement tools tab you can choose one of the automatic filtering tools. They are all fully automatic and providing effects that you can’t do in other application without extensive experience in image manipulation. Some of the filters have a strength scrollbar and it is recommended to use them with the default setting. All these filters are detaily explained in the filters section of this wiki.
High quality processing
Unlike most of the programs operating in 24 bit color mode, Final Touch operates in a unique 36 bit color mode. That means that instead of 16.777.216 colors, you work in a 68.719.476.736 colors mode. This provides 4096 times better quality for the filters and allowes you to use multiple filters on the image without visible quality loss. The images are converted back to 24bit quality when you save them, so if they are about to suffer multiple filtering, it is best not to save the images until all changes are complete.
Unique filter equations
Most of the filters uses unique equations to get the desired effects. Some of the filters are totally unique, while other filters are seen in most of the image manipulation applications, but working compleatly differently in Final Touch. The aim was to provide much better results. All these filters are based on my own experiments, so I’d appreciate any comments on their functionality.
Filters
Brightness / Contrast
Using this filter pair you can adjust the brightness and the contrast of the modified image. You can either darken or brighten the image using the brightness fiter, but if you turn on the “maximize luminance range” switch, you will always have both black (zero luminated) and white (maximum luminance) pixels on your image.
Here is an example of the brightness filter with and without maximize luminance range subfilter:
 unfiltered image brightness = 100% |  brightness = 150% without maximize luminance |  brightness = 150% with maximize luminance |
|---|
ok
Hue / Saturation
You can adjust the colors and the colorization of the image using this filter pair. What is unique in the way Final Touch renders theese filters is the high quality mode. The high quality mode allows you to increase saturation on previously compressed images and get decent results - which is impossible to do using the standard calculation methods.
Sharpen / Blur
I’ve decided to link the sharpen and the blur filters because they both affect the same aspect of the image - sharpness. So basicly if you use 0% sharpness, the result will be the original image. If the sharpness value is positive, the sharpen filter will be applied, if the sharpness value is negative, the blur filter will be applied. You can use the filters in standard mode or just to sharpen or blur pixels along X or Y axis (X axis sharpen / blur with a small radius is great for interlaced images for example). This filter pair is a bit different from the conventional sharpen / blur filters in 2 aspects:
- sharpening with custom radius
- unique smart blur method
Sharpening with custom radius
Images with extremely high resolution are common nowadays. If a high resolution image is blurry, it is not enough to sharpen the pixels by just examining the nearby pixels, you must examine much larger number of pixels to get the correct value of the sharpened pixel. So if you are editing a high resolution image, you should increase the radius.
Smart blur
While most of the image manipulation programs are using thresholds to determine if a pixel should be mixed with the pixel we are bluring, my method works by applying a tolerance level. If a pixel is outside the tolerance level, it will be ignored, and the pixels within the tolerance level will have less impact if they are more different from the pixel we are bluring. The effect working in this manner can be efficiently used for noise reduction or to reduce “unwanted details” on your skin.
Levels / Gama
The levels / gama filter pair is an essencial part of any image manipulation program. Using it you can modify the dynamics of the luminance channel (in chrominance / luminance mode), any of the Red, Green and Blue channels or all 3 RGB channels. You can acchieve nice colorization effects if you modify the gama values for only one of the color channels, or you can use this filter pair to extend the image luminance range (this can be also done with the maximize luminance range filter in the brightness / contrast panel). To make it easier to adjust the values a histogram is drawn on the toolbar. Here are 2 example histograms, luminance and RGB for the same image:
 |  |
|---|
Resize / Crop
You can use this filter pair to change the size of your image. By cropping the image you can cut out a part of the image you need. Using the resize you can increase or decrease the resolution of the image.
There are 3 resize methods:
- Nearest neighbour
- Standard interpolation
- Smart interpolation
The standard and smart interpolation methods are the same in case of decreasing the image resolution, but if you want to increase the image resolution, the smart interpolation method will give you better results. Here is an example of an image resized from resolution 240×180 to 320×240 using the 3 available methods:
 nearest neighbour |  standard interpolation | 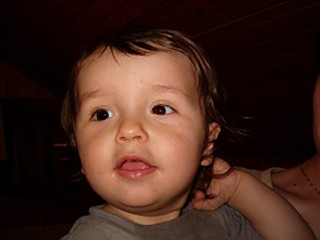 smart interpolation |
|---|
Rotation / Mirror
You can rotate the image using this filter pair, and fix it if it is upside down or landscape instead of portrait. If you use the fine rotation, the image will be zoomed in to keep the same image size and to avoid blankness of the image edges. It is calculated with antialiasing, and the result is sharpened a bit to avoid blurriness in the resulting image. Here is an example of the fine rotation:
 original image precise rotation = 0 degrees |  rotated image precise rotation = 4 degrees |
|---|
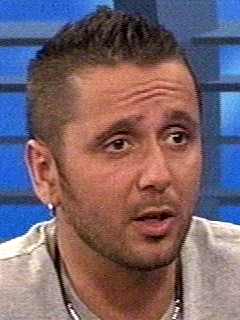
Red eye removal
Using this filter you can automaticly remove the red eye artifact from the image. However since there is a large number of different types of the artifact, the filter doesn’t works well in all cases. When you press the select eye button, the image in the work are will be zoomed to 400% and you will be able to select the eye you want to fix. When you right click on the image, the eye will be selected and the filter will be previewed in the work area. If the program didn’t selected the eye correctly, you should try to click on another pixel, and so on until the effect is correct. If the best result you’ve got did not removed the artifact, you can apply the filter several times until the result is good. In the following example the left eye is filtered 3 times, while the right eye is filtered only once:
Noise removal
This filter is very simple to use. All you need to do is to specify the strength of the filter, and watch the image without any noise. As an example I’ve cut an image from a frame captured via TV card from an UHF TV channel:
 original image |  filtered image strength = 75% |
|---|
Compression artifact removal
This filter is 100% automatic. You can use it to remove artifacts from extremely compressed images. An example follows:
 original image |  filtered image |
|---|
Equalize
This filter will make your images mathematicly perfect. However mathematicly and visually perfect images are often not the same. It is mostly good to use this filter at 50% strength for luminance channel only. However you should try to experiment with it, it can give you really good results on some images. Example images follows:
 original image |  equalized luminance strength = 50% |  all channels equalized strength = 50% |
|---|
Auto processing
There are 2 auto processing filters:
- Auto sharpness
- Auto region equalize
The auto sharpness will automaticly adjust the sharpness of your image, sharpening it if it’s too blurry or blurring it if it is too sharp. The auto region equalize will scan the image and correct it if it is partially dark. And example of the auto region equalize follows:
 original image | 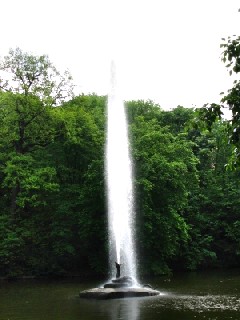 region equalized image |
|---|
General convolution
The general convolution makes it possible to create custom filters with a 5×5 matrix. If you are not sure how to create your own convolution, you might try some of the pre-created convolution matrixes from the initial program package. Here are a couple of convolution matrix examples:
 photo negative filter |  deinterlace filter |
|---|
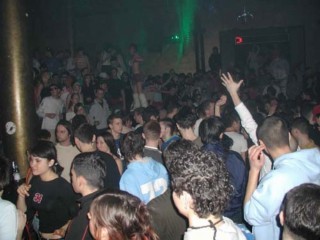
Lightning effects
Using this effect you can create dark images, very much like if the only lightsource is a flashlight. You can also add bumpmapping and get an artistic look for your image. You can position the lightsource on the small image on the toolbar, and you can set the radius and intensity of the light and the glow effect. The light effect will darken the parts of the image which are outside the light radius to the level of the ambience intensity, while the glow effect will add extra glow within the specified radius. Here are a couple examples:
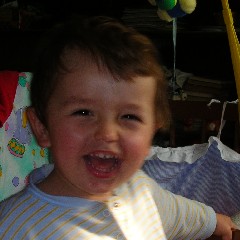 original image no filter applied | 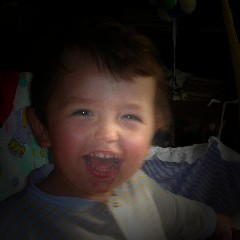 filtered image without bumpmapping | 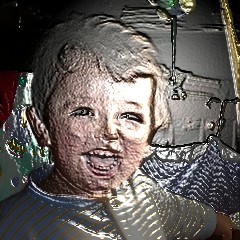 filtered image with bumpmapping |
|---|
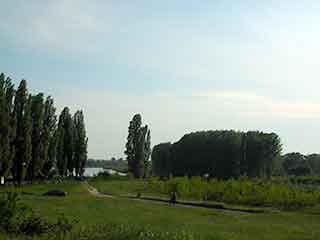
Diffuse glow
If you want to add a diffuse lightsource effect to your image, this is the filter you want. You can set the glow and clear ammount to tell the program how much glow do you want to add. And you can also set the strength of the effect, where 0% is same as the unfiltered image and 100% is the full intensity of the filter. Here is an image filtered with diffuse glow:
 Original image |  Filtered image Glow ammount = 50% Clear ammount = 50% Glow strength = 100% |
|---|
Edge detect
This filter will create a black image with white lines at the edges of the objects on the original image. You can set the edge radius and the strength of the filter.
| Original image | 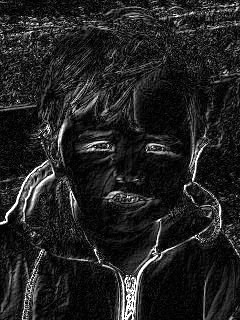 Filtered image |
|---|
Emboss
The emboss effect creates a stone relief from the image. You can specify the radius of the relief edges and the direction of the light. You can also reduce the strength of the effect, in which case the result is like a stone relief with mild painting on it. Here is an example of an emboss with 100% strength:
| Original image | 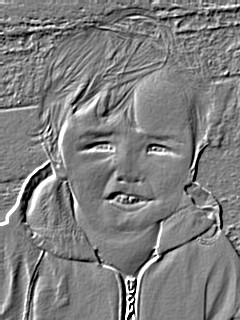 Filtered image |
|---|
Icey
The icey effects transforms the image as if it is a reflection on ice surface with relief. You can specify the length of the relief and the ammount of the colorization on the toolbar. Example follows:
| Original image | 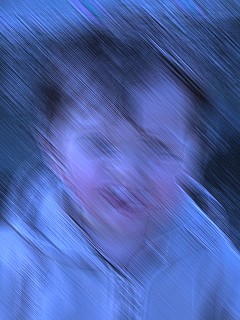 Filtered image |
|---|
Painting
If you apply the painting effect on a photo, it will be transformed as if it would be a painting instead. You can select the size of the painting brush. If the size is smaller the effect is less, and if the size is larger you lose some details on the image. The recommended usage of this image is on high resolution images with larger brush size. Here are 2 examples with different brush sizes:
| Original image |  Filtered image Brush size = 2 |  Filtered image Brush size = 4 |
|---|
Video processing
The video processing part of Final Touch is a bit tricky. To filter an image sequence you should choose the input and output folders, set the input and output framerate, the desired speed of the output video, fields mode and filters to apply. You can use any of the image manipulation filters if you record a batch script first. To record a batch script you need to select the input and output folders, click on the Enable preview button and select a frame from the image sequence to work with. Once you’ve done that you can select the “Start batch recording” in the menu and then to add the desired filters to the batch. Once you’re happy with the filtered image, you should select the “Stop batch recording” in the program menu. Once you’ve done this, you should set the other video options, and press “Apply filter engine”. The program will then automaticly process every frame in your image sequence and save it to the specified output folder. The files will be always renames as: “renderedxxxxxxxx.bmp”. You can then import the output folder to your video editing software and converth the image sequence back to a video file.
Folders
You can choose the input and output folders in the “folders” video processing page. Make sure to select different input and output folders because video editing programs might have problems with importing the results if you have both the input and output images in the same folder, especially if you have resized the images during the filtering process.
Field settings
You can select the input and output field modes on this page. If the input field mode is interlaced and the output field mode is progressive, the material will be deinterlaced. If the input mode is progressive and the output is interlaced the program will try to predict the half frames between the 2 full frames and interlace the video using the predicted frame. The possible interlce modes are:
- Interlaced - upper field first
- Interlaced - lower field first
- Progressive
Framerate settings
You can set the input and output framerate in this page. You can choose between PAL (25.00), NTSC (29.97) or custom framerate. If you choose custom framerate the number you’ve entered will be used. If you enter an illegal combination, the program will reset the framerate to default - 25.00 fps.
You can also set the video speed of the output sequence, from a range of 25% to 400%, or one of the autoresize modes:
- Resize to match PAL standard, or
- Resize to match NTSC standard
Choose filters
You can apply 3 filter types to the image sequence:
- Video noise reduction filter
- VHS artifact removal filter
- Recorded batch
The Video noise reduction filter is different than the image noise reduction filter because it uses multiple frames to reduce the noise on the video material. This filter reduces the noise to 50% and you can apply the image noise reduction in your batch script to increase the noise removal effect.
The VHS artifact removal filter will remove the luminance noise present on all VHS materials.
The “Apply recorded batch to all frames” checkbox is grayed by default, and it becomes available once you record a batch script. The batch script may contain all image manipulation filters except for the red eye removal filter.
Discussion
Feel free to add your comments to any of the sections bellow.
Suggestions
Please enter your suggestions in this part of the page.
1.
- jumar: You could add “center” buttons to some trackbars to restore them to their center/default value. For example when you modify the brightness and you want then to set it back to 100% it would be good to have a button that resets the trackbar automatically to the original value.
- auth: There is no need for such buttons, pressing the Cancel button does that.
- jumar OK Sory for that...
2.
- jumar: The Crop function is not very easy to use... Selecting the crop surface with the mouse on the screen would be much user friendly (but certainly much more complex to code...)
- auth: Yes, you might be right about this, so I’ll probably add the work area selection feature. It is not the coding difficulity that stopped me, but the fact that I’ve seen solutions similar to the implemented on in most of the programs I’ve tested (VirtualDub, Photoshop). There are a few other bad things with the onscreen selection:
- You can’t specify the wanted cropped are in one pixel precission (crop 800×600 to -exactly- 640×480 for example)
- You can’t even specify the area precisely on very large images because you will have to zoom out, so the selection precission will be 2 or 4 pixels.
I would like to ask for other people to state their opinion on this aswell before the final decision.
3.
- jumar: For the red eye removal tool it would be a real advantage to be able to manualy change the size of the area to process. If the picture is a close up, the eye can be much bigger than the sellected area so you must apply the filter multiple times to obtain a good result.
- auth: Yes, the red eye removal need some additional work. I’ve got suggestions about manually selecting the circle work area, but I think I’ll add 3 sliders: “minimum eye size”, “maximum eye size” and “selection tolerance”. What I was actually trying to achieve here was an easy to use filter, so I implemented a solution that works well with 80% of the images but doesn’t need to much action from the user.
4.
- jumar: In this page you call “toolbar” what I would rather call “Left pannel”...
- auth: I will think about this for a while because it would be logical to call it “left panel”, however in the program menu it is called toolbar (note: View → Show toolbar).
5.
- Michael Rybak: Great work, auth, and this is really a lot of work, my congratulations! I was most impressed by compression artifact removal and noise removal (the latter works really better for me than Photoshop’s, or at least is easier to use so I can get what I want). I’ve already used FinalTouch for my game, to put a lightning bumpmap on my watermelon :)

Again, great work; the only note I could leave now is that “preview” button at “image adjustments” tab replaces the picture into initial position, which is not convenient.
Bugs
Please report any bugs you’ve found here.
1. status: problematic

- Michael Rybak: This bmp was saved from Photoshop. I really don’t know what’s wrong with it; something “special” I’ve done with it in photoshop is playing with Hue and Color Balance. After that I’ve *erased* everything a drew what you see on it, but the problem persists. FinalTouch fails opening it with “Stream read error” message. Even MS Paint opens it though. I’ve put in a sfx archive - well, I was trying to, but I could’t :), is there a way to store an exe here?
- auth: Yes, I’m aware of this, the program can’t open Windows formatted .bmp files, but only OS/2 formatted. You can save the .bmp file in the Photoshop using OS/2 formatting, and then Final Touch will be able to open it. This bug should disappear when the multi fileformat support is added.
- Michael Rybak: No, it’s not because of Windows|OS/2. I’ve just created an empty image and saved in “Windows”bmp format, and FinalTouch opened it successfully.
- auth: Have you tried to convert the problematic image to OS/2 format?
- Michael Rybak Yes, and it is opened successfully, but this isn’t the point. Try the following:
- take the “winlibre_soc:question.png” picture (
 ),
),
- open it with Photoshop; you should have a 1024×768 pic
- convert it to bmp (Windows, 32 bit)
- FinalTouch doesn’t open it (”Stream read error”)
- In Photoshop, crop the image in *any* way, and save it again in same format
- FinalTouch opens it

- take the “winlibre_soc:question.png” picture (
- auth: I have the same error with 1152×864 images too, but everything is ok when the images are even one single pixel different! I have no clue what is causing this, but it’s out of my range - since the .bmp support code is a native Delphi feature -, so this bug will remain in the final version too. I’ve tried to open it using GraphicEx and ImafeFileLib, and got the same error. All I can do is to recommend not to use bmp file format once I add the support for other fileformats...
- Michael Rybak: Of course, this bug isn’t big deal, but if I where you, I’d handle that error telling user something more friendly than “Stream read error” in the annoying error-dialog. I’d also (probably after September 1st) take a look at something like this and propose the user to auto-convert the “bad” bmp to OS/2 bmp.
- auth: Ok, that makes sence. Thanks for the advices.
2. status: fixed
- David James: There’s a small spelling mistake on the menu - one of the menu items on the top left is spelled “enhacement”, instead of “enhancement”.
- auth: Thanks. This bug is removed. (Not updated to the download version yet tough)
3. status: in progress
- Bertrand Cachet: I can’t cancel the modification I have done with Artistic and Lighting effects.
- auth: It is working, but partially. While it resets the scrollbars, and cancels the preview effects on the Image Adjustments tab, it only cancels the preview effect, but not resets the GUI elements in the Special Effects and Enhancement Tools tabs. This will be fixed soon.
4. status: in progress
- Bjorn: When you run Final Touch, it will center itself on the desktop, but in a multi-monitor environment that means half appears on one monitor and the other half on another.
- auth: I’ll fix this bug by removing the poCentered flag, and putting the default application position to desktop topleft corner. The application will then write the size and position information into the .ini file, and always reposition itself where the user left it.
- Bjorn: “always reposition itself where the user left it“. If you do that then you need to include a check to make sure that the window rectangle isn’t clipped or less knowedgable users will think your application vanished if they change their monitor layout or change their screen resolution.
- auth: You’re right, I’ll implement it that way. Thanks.
5. status: problematic
- Bjorn: When you pan around the image, it will flicker.
- auth: This one will be hard to fix because it does not flicker on any of the machines I can run it. Will give a try tough.
Development
If you want to follow the further development process of this program, or you are interested in learning more about the technique used withing, feel free to visit the Final Touch development wiki.
If you are a developer yourself and want to see the sourcecode of this opensource project, or any of the other WinlibreProjects, you may Browse WinLibre CVS. The Final Touch is in the IMT module.
